Ebook: Tiny House Blueprint: Inspiring Floorplans for Small Living
Limited-Time Offer: Now Only $14,99 (Originally $19.99 - Save 25% )
Day(s)
:
Hour(s)
:
Minute(s)
:
Second(s)
Get our eBook, “Tiny House Blueprint: Inspiring Floorplans for Small Living”, for just $14,99! Perfect for anyone starting out or refining their tiny living plans. Transform your dream into reality today!
Join our mailing list to receive the latest news and updates from our team.
You have Successfully Subscribed!
One of the first steps in building out a campervan, and one of the first big choices you have to make, is how to properly insulate your van–or if it’s even necessary to do so.
And after living on the road in my (insulated) campervan for multiple years, I have come to a conclusion that may shock you: If I were to do it again, I wouldn’t insulate my van.
But it doesn’t mean you shouldn’t.
There are pros and cons to insulating and plenty of different insulation options to choose from.
In this in-depth guide below, I go over the basics of insulation, when it is and isn’t a good idea in a campervan, and give you an overview of the best insulation options for campervans (trust me, I know them all).
After you’re finished reading, I guarantee you’ll know everything you need to insulate (or not insulate) your van effectively, on your own.
So let’s dive in.
Should You Insulate Your Van?
This is one of the most common questions I get asked when van builds come up, and I’ve spent a long time thinking about it.
When I built out my van, insulation was all but gospel in the van-dwelling community. For that reason, I made sure to install polystyrene panels on the walls and roof of my van.
After traveling in it as much as I have (how many years?) I don’t think I would be insulated if I were to do it over.
While insulation can help you reduce the speed of heat transfer, it honestly won’t make much of a difference in a van setting. The space you’re working with means you can install, at most, 1-2 inches of material.
Even with a very high R-Value that won’t do much, and it ignores a key issue with a van, namely windows.
It’s especially true if you plan to spend much time in hot weather climates. In that situation, you want to maximize heat transfer to cool down your van from the heat produced by your body.
Active and passive temperature control steps such as running a roof fan and parking out of the sun will have vastly more significant impacts than the amount of insulation you can install.
If you’re traveling in very cold weather conditions you may still want to insulate, but make sure you know what you’re actually getting with it.
Types of Heat Transfer
There are three ways that heat is transferred into or out of your van. These are Radiation, Conduction, and Convection.
Radiation
Radiation is heat that is transferred via ultraviolet rays. When you feel the heat of the sun on your face, you’re feeling radiative heating.
Dealing with radiated heat involves reflective barriers such as Reflectix panels in the windows and controlling where your van is parked.
By limiting the amount of sun entering through your windows and windshield you can reduce the heat transfer.
Conduction
Conduction heat, for the purposes of insulation, is direct heat transfer from physical contact into or out of your van. This is the heat transfer traditional insulation is most focused on preventing.
The metal walls and ceiling of your van are excellent at conducting heat. You can limit this transfer through insulation on the walls and roof, but can also significantly manage it by parking strategically when possible.
In the summer, try to park in the shade to stay cool, in the winter, try to park in the sun to benefit from passive heating.
Convection
Convection refers to heat transferred through the movement of liquids and gases. In a van, this comes down to heat coming in from the ground below or heat going out from the roof above.
If you’re planning on being in mostly cold climates, insulating your roof can help reduce heat loss. Likewise, if you’re more a summer climate vandweller, the goal should be to maximize heat transferred out through your roof while minimizing heat gain from hot asphalt or ground.
Key Factors in Picking Insulation
Before I dig into insulating a van, you must understand a few key terms that come into play.
R-Value
R-value is the industry term used to refer to the effectiveness of insulation to resist conductive heat loss. It refers specifically to the insulation efficiency per inch of material. The higher the R-value, the better and more efficient an insulation material is.
There’s more to it, but to pick out van insulation, just remember that you should always go for insulation with a higher R-value.
Installation Difficulty
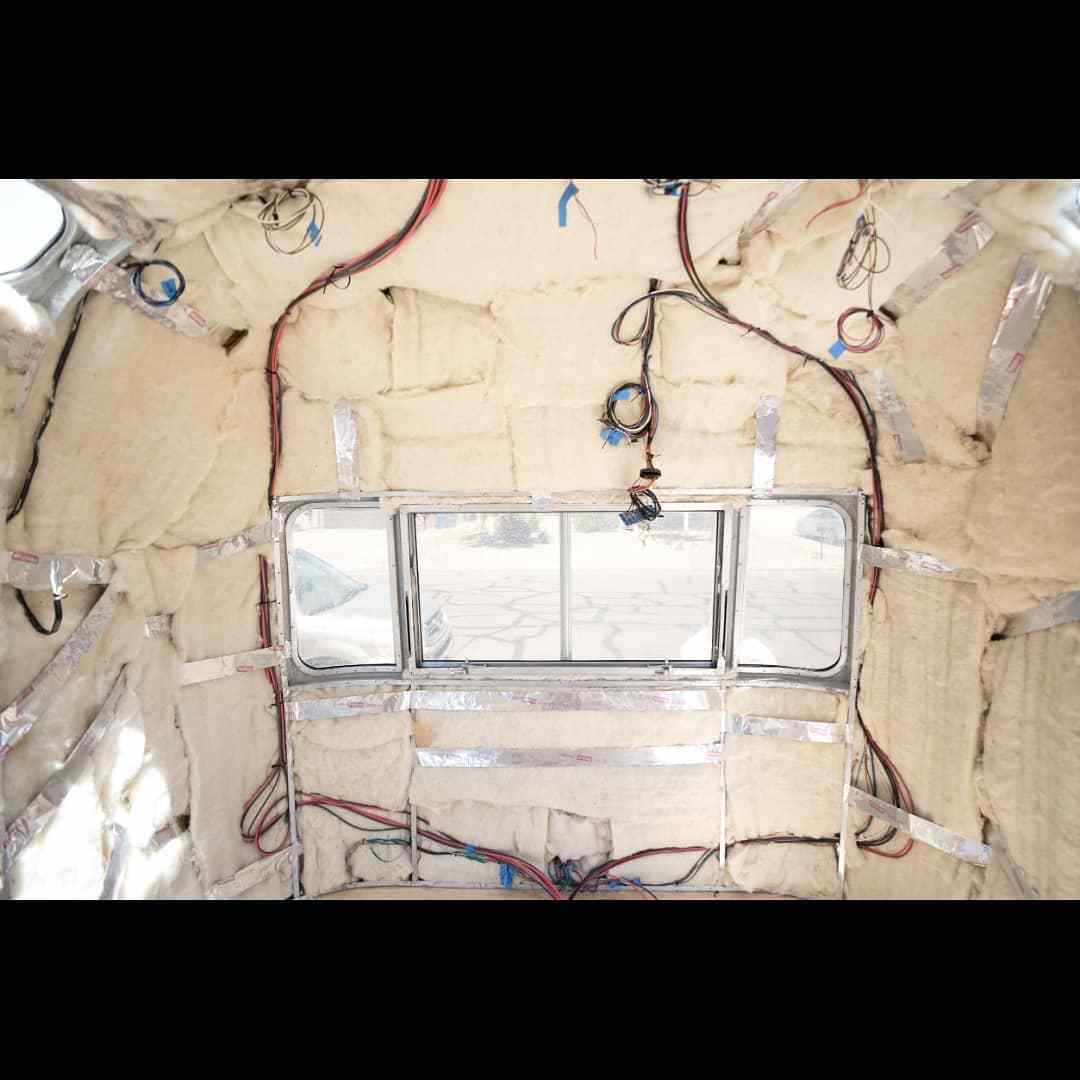
Vans aren’t exactly known for level surfaces and the easy layout of their interiors. Once you’ve stripped out all the internals, you’re left with a seriously odd set of walls, usually without large flat spaces, and definitely with some obstacles like wheel wells, windows, wiring, etc.
The Stripped Out Interior Of My Van
Many people favor foam board, polyiso, and spray foam insulation for this very reason. They’re harder to install initially, but they pay off in the long run.
Space Constraints
Let’s face it: There are few insulation jobs you’ll find with less space to work with than in a campervan. That’s one of the reasons I generally recommend you forgo all but roof insulation.
At most, you’re looking at 1-2 inches of insulation.
Where to Insulate Your Van
There are four places to consider insulation for a camper van. These are the roof, the walls, the floor, and the windows. What type and how much insulation you use depends heavily on where you want to insulate.
Heat rises, so your heaviest insulation should be on your roof to keep heat in during the winter.
Your walls are next, with the floor of much less importance for winter insulation.
If you’re worried mostly about heat retention in the summer you don’t want to insulate your roof but definitely want to insulate your floor.
Asphalt retains the heat of the sun for hours even after it’s gone down and can radiate it up into your van while parked.
Types of Insulation
There are only a few categories of insulation you should consider when planning out how to insulate your van.
Board Insulation (Polyiso, Polystyrene, etc)
Board insulation is one of the easiest ways to insulate your van. These come in panels of up to several inches thick and can be cut to fit your space. Polyiso offers the highest R-value but extruded polystyrene can be easier to work with for newbies.
When I built my van I went with extruded polystyrene panels. They were relatively easy to cut to shape and could be securely installed using double-sided mounting tape.
They offer a high R-value and don’t accumulate water from condensation.
Loose-Fill and Rolled Batts (Fiberglass and Wool)
If you ever played in your parent’s attic as a kid, you probably saw either big sheets or piles of what looked like cotton candy all over the place. If you’re like me, you probably came down itching like crazy after touching them too.
Those batts are made from fiberglass and are generally not recommended for van dwelling.
They tend to settle over time while driving and can leave whole sections of your wall without coverage.
One option that I do recommend in the batt category is wool insulation batts. These are made from natural sheep’s wool and offer many characteristics I look for in good van insulation.
They’re naturally fire-resistant, inhibit mold growth, and are 100% natural and chemical-free. My pick for wool insulation batts or loose-fill is Havelock Wool. They offer a product specifically sized for insulating a van, a great help for folks just getting started.
Spray foam is a popular insulation option out there and comes in two varieties. These are open-cell and closed-cell, with closed-cell being by far the more widely used option for van dwelling because of its higher R-value and noise-deadening properties.
Spray foam is great if you’ve got a van with lots of nooks and crannies you want to insulate or if you have a less than perfect condition body shell with potential openings or holes you want to seal. DIY kits are easier to use than they once were and even expand to fill places like door panels, in between ribbing, etc.
There are some downsides. ‘Easier to use than before’ notwithstanding, you still need to know what you’re doing and have a steady hand to make it work for you. You’ll need to pick up some safety gear to correctly apply it, which can be intimidating to new DIYers.
Here’s a great example of how the process works from Golden Advantures:
There’s also the fact that many spray foams off-gas while curing, with the potential for negative smells or less than healthy chemicals to be emitted into your living area.
If you’re willing to practice and follow proper protocols as far as venting goes, spray foam can be a great option.
Reflectix is a highly effective radiant barrier that acts to block heat transfer from the sun’s rays.
It’s a thin sheet of bubble wrap with a coating of highly reflective foil on the outside that serves to bounce back UV radiation.
It’s an excellent option for window and windshield covers but has a history of being misused in van dwellings. If you’ve been checking out Youtube videos of van builds (and let’s face it, we all have) you’ve no doubt seen someone gluing Reflectix right onto the metal walls of their van.
This is entirely ineffective.
Reflectix shines in reflecting UV rays, and it’s all but useless in blocking the conductive transfer of heat.
For windows, you can easily cut it to shape for a custom fit in every window on your van.
Reflectix Installed On My Van
Should You Install a Vapor Barrier in Your Van?
In-home construction, a vapor barrier serves to seal the walls, ceiling, and floor of your home from moisture transmission. It’s generally a plastic sheet between the exterior wall and insulation to help keep humidity from seeping in.
Many van plans and van construction diagrams I’ve seen online list a vapor barrier as an essential part of the build, but to be honest, I strongly disagree.
The metal exterior of a van body is itself impervious to moisture, and the barrier doesn’t go over the windows, doors, or other required openings. You should do a thorough check of your van body for any holes when you’ve prepped it for the build, but there’s no need to install a complete vapor barrier.
Final Thoughts
Whether or not to insulate comes down mainly to where you plan to travel and how much space you have to work with. Those in larger modern vans such as Sprinter’s will see more benefit than those working with older cargo or conversion vans.
For those in cold climates, a good option is to insulate the roof and walls of your van to prevent heat loss from conduction and convection. Board-style insulation and spray foam are good choices here, as are wool insulation batts.
For those in warmer climates focus on insulating the floor to prevent heat gain from asphalt and on covering all windows with reflectix panels to prevent radiative heat gains.
Got a hankering for more awesome related content? We got you covered! Check out the pieces below:
Josh is a freelance writer and avid outdoorsman. He graduated from the University of Georgia with a B.A. in Political Science and has done his best since to live location-independent. He's been a firm supporter of the tiny movement, new homesteaders, and sustainable alternative living and used his knowledge of these topics to convert a 1999 Dodge Ram van to explore as much of Wild America as he could reach.
Join the 2,995 tiny house lovers
Join our mailing list to receive the latest news and updates from our team.
Given the pace of life today, one of the most sought after solutions is the tiny home. There are people who have embraced the minimalist lifestyle, but do not fully know how to pivot to that kind of norm or do not have the resources and knowledge to achieve it. A tiny...
Minimalism has gained traction in recent years as an admirable avocation or trendy design style. This is particularly useful for people who have the aspiration to live in tiny houses. Adopting a “less is more” attitude brings more order in small space while also...
So. Is it really worth it to put your money into solar panels for campervans? Are solar panels even needed to live off grid? Let’s help you decide whether or not solar panels are suitable for your travel lifestyle and budget. Understanding Solar Panels Before...
We use cookies to optimize our website and our service.
Functional
Always active
The technical storage or access is strictly necessary for the legitimate purpose of enabling the use of a specific service explicitly requested by the subscriber or user, or for the sole purpose of carrying out the transmission of a communication over an electronic communications network.
Voorkeuren
The technical storage or access is necessary for the legitimate purpose of storing preferences that are not requested by the subscriber or user.
Statistics
The technical storage or access that is used exclusively for statistical purposes.The technical storage or access that is used exclusively for anonymous statistical purposes. Without a subpoena, voluntary compliance on the part of your Internet Service Provider, or additional records from a third party, information stored or retrieved for this purpose alone cannot usually be used to identify you.
Marketing
The technical storage or access is required to create user profiles to send advertising, or to track the user on a website or across several websites for similar marketing purposes.


")